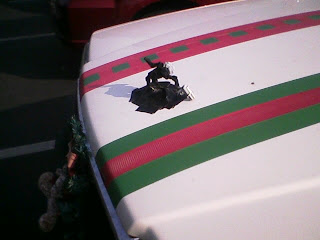
Mirror, mirror on the car.
What's the best tape by far.
Duct Tape!
Rick
Saturday, August 30, 2008
Sunday, August 17, 2008
Failure to Repair
This post is about a something I was not able to fix. A friend had a laptop (HP pavilion ze4900) with no screen image, so he brought it over. It turns out that it had only a dark gray image without a hint of video signal and the video-out VGA port had the same problem. A bad sign. I switched memory chips since it was an easy thing to do and no luck. Another bad sign.
Next step, take it apart. I found something suspicious, a dark spot on the shielded cable to the LCD monitor. It is in the left side near the hinge points.
Here is a close up.
Conclusion: The short fried important components in the video circuitry. A little web research found that the video circuitry is integral with the main board and that a replacement board costs about $300.
So, we pulled the files off the hard drive and put them on a memory stick. He was glad to have his files back.
Rick
Wednesday, June 11, 2008
More Mobile Duct Tape
Saturday, May 24, 2008
Circular Saw Hack
I don't have a table saw (too big to store) but I needed to cut a board in a way well suited for a table saw.
So, I used clamps and a 1 by 2 on my circular saw to create this temporary tool.
Then I tested in on the board I needed to cut as shown here,
Looks right. Then using the bed of my pick up truck as a work holder, I made the cut. The board is redwood so that make it all a lot easier. Here is the final result.
A 15 foot angled cut as good as a table saw could have done.
Rick
Duct Tape Goes Mobile
Duct tape is available in black, but some may say that in such a case, it is actually gaffers tape.
In any event, black duct tape can be great for dressing up your car as you can see in this photo.
Add a little red and green duct tape on the front, then tape on a action figure as a hood ornament, and presto, you have your own art car.
Rick
In any event, black duct tape can be great for dressing up your car as you can see in this photo.
Add a little red and green duct tape on the front, then tape on a action figure as a hood ornament, and presto, you have your own art car.
Rick
Tuesday, April 22, 2008
Bank Trouble
Friday, April 11, 2008
Sealing Paint Cans
Like many people, I save partially used paint for touch-ups or the next project. However, when I come back, it has often partially dried out. I tend to use water based paints both latex and enamel. I also use moisture cure urethanes and for these, resealing is critical. Sometime, much time passes before I use the paint again, so that makes things worse as well.
Now I do three things that seem to help.
First, I open cans with much greater care. If the metal lid gets bent during opening, then it does not seal as well. It takes longer to pry to lid off a bit at a time as you work around the circumference, but I think it pays off. Wide pry tools also work better than really skinny ones. Of course, if I know that I don't need to save the can, I pry away with glee.
Second, I spend a bit of time cleaning out the groove in the can before I replace the lid. This helps especially if you need to use and then reseal the can several times.
Third, I use plastic. Sometimes I use an adequately sized clear plastic food bag. More recently I have switched the Glad Press'n Seal wrap. I place the plastic film over the can and tap the lid back on. My theory is that the plastic film needs to be of the type type that can stretch a bit.
I think it works by filling in the small gaps that tend to occur between the lid and the can.
No matter what, the paint will eventually become useless. But this has extended the shelf life for me.
Rick
Wednesday, April 09, 2008
Altering my Environment
I have a narrow lot that slopes a a few feet across the narrow direction. To create a flatter area for a narrow grass strip, I decided to use retaining blocks. I found the ones I liked best (Verdura Brand) but their design is best suited to stacking, and that is not what I needed. This photo show a Verdura 30 block.
The rounded part is good and the squarish bits tend to show through the soil and interfere with the grass I want to plant next to the blocks.
So, if I don't like something I see if I can change it. In this case that means removing the parts I don't like. I tried pounding off the square parts with a 5 pound sledge, but it tended to ruin the parts I wanted to keep. Then I tried using an abrasive saw blade to cut the block. Very time consuming and it chewed up abrasive blades.
New plan. First I drill two 3/8" holes using my hammer drill.
Then I use my new purchased stone feathers shown here. (About $32 for a set of 5 with shipping. The internet is a wonderful thing.)
And I placed them in the holes aligned in the directions that I want the split to occur.
Tap on each in turn until a crack forms. Keep on tapping and then, presto.
Repeat for the other side. Position the block in my retaining line.
Repeat as needed.
It turns out that modifying the blocks does not take much time. Moving and positioning these 65 pound objects consumes most of the effort. But I like the results.
Rick
Tuesday, April 08, 2008
Squeaky Wheel - Not a Grease Problem
We have a 1996 Honda Odyssey that we bought used a few years back. On a trip a bit over a week ago, it developed a right front squeak that came and went. It would go away with light or firm brake pressure. Sometimes it came back and sometimes it did not. At higher speeds, it disappeared completely and then returned again after making a stop.
So, I took the right front wheel off and found that I had worn rotors (thickness under specification by quite a lot) and thin brake pads. Maybe the problem and maybe not. On Friday I bought a new pair of rotors and a set of brake pads. Later on the weekend I installed them. A mostly straightforward process. (Note to self: It is generally better to start off with a six point socket especially on suspension and brake parts.)
So what about the squeak? These Honda brake pads have a creative wear indicator design. The little U shaped metal loop visible on the right brake pad shown below acts like a crude one-bad-note musical instrument whenever the pads get thin. When thin, the metal loop rubs on the turning rotor and it plays its only available note.
The pad on the left had the same loop but it must have broken off just the day before the replacement. (Photo taken with my cell phone and then image improved using GIMP.)
The problem is solved but I remain slightly puzzled. It seems like it should have squeaked when I applied the brakes and not when I let off.
Rick
Duct Tape - Now With Color Choices
I use duct tape for many things, but never on ducts of course. I have the standard gray but also a few other colors.
I once received a humorous book on the many uses of duct tape. On another occasion, I received a "Duck" tape T-shirt. (It shows a duck taped to a wall with duct tape.) So it seems that people who know me associate me with duct tape even though I restrict my use of duct tape to the garage (mostly).
So yesterday, when I saw this creative use of blue duct tape, I decided to share it.
Rick
Monday, April 07, 2008
Dryer Vent
On several occasions, my daughter has commented that I sometimes fix things by taking out parts.
A few weeks ago, my daughter asked me about what causes dryers to take too long to dry. It seems the dryer where she lives take more than 80 minutes to dry a load. I offered some of the easier things to check and she tried these, but none helped. So, when we visited last weekend, I brought along an old shop coat.
Looking behind the dryer, I saw a standard flexible vent hose, but, it looked a bit too long to me and it made several turns before attaching to the vent connection. (Sorry, no before photos.) My friend Jim recently told me about how he solved a dryer problem by shortening the vent hose, so I decided to try his idea.
I put on the shop coat, climbed behind the dryer, and we performed a vent-tube-ectomy. This shows the left over bit. Not much really, a bit more than two feet of length.
We also removed a small amount a lint and then reconnected the newly shorted vent tube. The result, fewer turns as shown here.
Then we ate pie.
The following day, I got a call. The results were in, dry times are now under 40 minutes.
So it seems that my daughter was right. I took a part out, put it back together, and now it works better.
Rick
Subscribe to:
Posts (Atom)